Upgrading To Windows 11 On An Unsupported Computer
Most of our existing Windows computers were seriously offended when their Windows 10 installations told them that they were unsuitable for upgrades. Windows 11 requires several hardware elements that weren’t included in computers until relatively recently, and an officially approved processor.
Windows 11 would have those older machines disposed of and replaced with shinier toys.
The hardware requirements of Windows 11 ostensibly make it a more secure environment. The degree of its enhanced security is somewhat theoretical, however. If you feel that you rather than Microsoft should be the final arbiter of your system security, you might take comfort in knowing that Windows’ pronouncement on the worthiness of your current computer is far from absolute.
You can sneak around its wall and install Windows 11 with relatively little work.
Newer and faster processors are a treat, but you can run Windows 11 on far more modest hardware. We’ve been doing so for several years as of this writing – it’s actually a bit quicker than Windows 10 in some regards.
The timeless Dell desktop computer at the beginning of this posting was one of the recipients of Windows 11. Back in the day, it shipped with Windows 7.
This posting will discuss installing Windows 11 where it might not officially want to be. As you might imagine, there are a few catches to doing this, to wit:
- You’ll have to get your hands dirty – some recourse to the Windows registry editor application will be required. Nothing therein should cause readers of this post to run screaming from their digs.
- Microsoft has intimated that Windows 11 installations on older, unsupported hardware may not receive updates in the future. We’ve seen no evidence of this to date – with one notable exception – but there exists the possibility that it could occur.
- You’ll need to ignore a few scary warnings during installation.
Note: The following discussion involves making changes to the system settings and major changes to your computer’s operating system. While the likelihood of all this going sideways and negatively impacting Windows… and your ability to use it… is remote, the possibility exists. By reading beyond this paragraph you agree that Alchemy Mindworks accepts no responsibility for any loss, damage or expense caused by your use of this page and the information therein, however it occurs. If you read any further, you accept these terms and you indemnify and hold blameless Alchemy Mindworks and all its stockholders, employees and suppliers from any and all monetary costs including attorney’s fees and court costs arising out of your use of this page and any information provided by it. We are unable to provide assistance with anything discussed in this posting.
Before You Begin
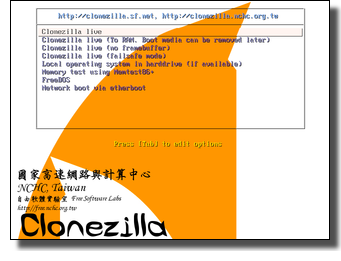 While our experience of upgrading unsupported hardware to Windows 11 was entirely unadventurous, we hasten to observe that doing so has the potential to trash your existing Windows 10 installation and leave your computer completely bricked. We’d like to urge anyone reading this post to clone the hard drives to be upgraded before doing anything else. Click on the foregoing link for a discussion of how this works. If the whole circus becomes pear-shaped, you’ll be able to restore your pristine Windows 10 installation and try again.
Windows 11 wants to see some specific hardware resources to run Windows 11, these being Secure Boot, TPM and EUFI Boot. While we won’t get into what these are up to just now, you should begin this adventure by finding out if they’re available in your hardware. Restart your computer and access its BIOS screen – usually by holding down the F2 key while the system starts up. Make sure there are options available to enable Secure Boot and TPM, and a choice between Legacy and EUFI booting. Don’t enable anything yet.
You can exit the BIOS screen and boot your computer normally.
To be sure what hardware Windows thinks your computer has, you should also get to a command prompt and run Msinfo32.exe. Make sure that the Secure Boot State option is present, and preferably, is on. It can be enabled in the aforementioned BIOS screen if it’s available, but not active – we’ll get back to some BIOS settings later in this posting.
Finally, run Tpm.msc to see if TPM is enabled. Once again, if it’s not, you’ll be able to light it up from your BIOS screen when we’re done, assuming it’s available.
In the event that your computer proves not to have Secure Boot and TPM options, read a little further in this posting for a procedure to get around these requirements.
Don’t Look Back
In order to upgrade to Windows 11, you’ll need to download the Windows 11 DVD-ROM installer image, an ISO file, from Microsoft. Click on the foregoing link to get it.
The first step in upgrading to Windows 11 on unsupported hardware involves some registry editing. Get to a command prompt and type regedit. Windows’ registry editor will open.
Select HKEY_LOCAL_MACHINE and navigate to SYSTEM\Setup\MoSetup. If there is no entry for MoSetup, create one, like this:
- Right-click on SYSTEM\Setup.
- Select New, and then Key. A new key will be created.
- Rename the new key MoSetup.
You’ll now need to add a new DWORD to SYSTEM\Setup\MoSetup. Select MoSetup and right-click anywhere near it. Select the menu item to create a new DWORD. Change the name of the new DWORD to AllowUpgradesWithUnsupportedTPMOrCPU. Double-click on your new DWORD and change its value to 1.
You can exit the registry editor and restart your computer.
Windows is now ready for an upgrade. Open File Explorer and navigate to where you downloaded the Windows 11 installation ISO file Double-click on the ISO to mount it in a virtual drive. Its contents will include setup.exe. Double-click on this item to begin the upgrade. You’ll see a scary message about your hardware being unworthy and ill-regarded. Click on Accept.
The Windows 11 upgrade has options to keep your current applications, settings and files; keep your current settings only; or wipe your hard drive and install a completely pristine Windows 11 environment. The latter two choices will necessitate reinstalling a lot of files and software, and likely will not be where you want to go. Select the option to keep your applications, settings and files.
Once the Windows 11 upgrade gets started, you should arguably leave the room and make yourself a sandwich, pour some wine, find some nearby woods and go for a prolonged hike or otherwise prepare for a substantial wait.
When the Windows 11 upgrade is complete, you’ll need to restart your computer and return to its BIOS screen as discussed earlier, probably by holding down F2 as it boots up. Switch from Legacy to EUFI booting, and enable Secure Boot and TPM. Save these changes and exit your BIOS screen to allow your computer to boot up Windows 11.
If everything worked, you should have a Windows 11 installation that looks more or less like Windows 10 did, with all your existing software installed and ready to rock.
Chances are you’ll want to repair and refine a few minor issues. Also, be prepared for a Windows environment that’s not quite as friendly as Windows 10 was, at least by default. We’ll get to these issues in a moment.
Ancient Times

If you have a really old computer to upgrade to Windows 11 – one that lacks TPM and a Secure Boot boot option – you’ll need to pursue a somewhat more elaborate installation process. Grab something solid.
Before you can install Windows 11 on a older computer, you’ll need to persuade it to relent concerning its insistence on what Microsoft considers secure hardware. Having run regedit to add a MoSetup key, as discussed earlier, you’ll want to leave regedit open and add a few more keys, as follows.
Navigate back to HKEY_LOCAL_MACHINE\SYSTEM\Setup, right-click on Setup and create a new key called LabConfig.
Select LabConfig and click in the right pane of regedit. Create a new DWORD and name it BypassTPMCheck. Right-click on BypassTPMCheck and modify its value to 1.
Now repeat the foregoing paragraph, and create a new DWORD. Rename it BypassSecureBootCheck. Modify its value to 1.
You can close regedit.
As of this writing, the current major release of Windows 11 is 24H2. This build of Windows 11 uses a number of low-level processor instructions that weren’t supported by the processors of computers long, long ago. If you install it on a sufficiently antiquated computer, the installation process will complete, and then display an error message to the effect that Windows 11’s install failed at the “safe_os phase.” It will thereafter return your computer to whichever Windows installation was previously running. To the best of our understanding, there’s no work-around for this issue.
Microsoft maintains a list of the processors that support the instruction set required by Windows 11 24H2 and better. It seems to be incomplete to some degree, but it’s a good place to start.
The previous major build of Windows 11, 23H2, doesn’t suffer from this problem. As such, if your hardware is fairly old, you might want to start with this one. This said, Windows 11 23H2 will stop receiving security updates on November 11, 2025.
Download the Windows 11 ISO installer, as touched on earlier in this post. Double-click on it in File Explorer to open it in a Windows virtual machine. Don’t click on setup.exe, but note the drive letter of the device it’s stored on. We usually put the ISO installer on a flash drive, so it’s drive F: or drive G: for us.
Get to a Windows command prompt, and run it as administrator. When the prompt window opens, type the following… or copy it from this posting and paste it into the command prompt.
G:\setup.exe /Product Server /Compat IgnoreWarning /MigrateDrivers All
Replace G: with the drive letter for your Windows 11 ISO file.
This command will make Windows think it’s installing Windows Server – which it appears to be prepared to do for less sophisticated hardware. However, as the installer ISO will be for Windows 11, that’s what will be installed.
As with the installation described earlier, instruct the installer to keep and your settings and files.
This too would be a good time to get some lunch.
Note that the Windows 11 installer will reboot your system several times. If you’ve supplied it with the Windows installer ISO on a flash drive, it might become confused when it reboots and fail to start. You’ll see a completely black screen in this case, with a flashing cursor in the upper left corner.
Should you encounter this issue, remove your flash drive and hit Ctrl, Alt and Del simultaneously on your keyboard to restart your computer. The installation will resume.
Dual Boot
If your computer has been configured to dual-boot two or more operating systems, the Windows 11 installer will disable the boot selection screen, make your other operating systems inaccessible. Here’s how to return them to life.
We hasten to add that dual-boot computers are somewhat unusual – if the foregoing paragraph sounded like Martianspeak, you can safely ignore this section.
Run a Windows command prompt as Administrator and type:
bcdedit /set {bootmgr} displaybootmenu yes
Hit Enter. The bcdedit program will confirm that it has updated your computer. If you restart the machine, the dual-boot prompt screen should appear as it used to.
By default, Windows will boot into Windows 11 unless you select a different operating system in the dual-boot menu. Should you want to it default to something else, run a command prompt as Administrator and type:
bcdedit
Hit Enter. You’ll see a list of the operating systems installed on your computer. These entries can be a bit cryptic – note that each one of them reference the drive letter of the partition in which its corresponding operating system resides. Use File Explorer to visit these drives to see which operating system they refer to.
When you’ve identified the operating system you’d like to set as the default, find the identifier line in its listing and note the field in curly brackets. Type:
bcdedit /default {os}
in your command prompt, replacing {os} with the identifier field of the operating system you want to select as your default.
The next time you restart your computer, it should default to your selected operating system.
Aftermath

We encountered relatively few genuine issues with our Windows 11 upgrades. We use TP Link USB Ethernet adapters on several machines, which Windows 11 decided were CD-ROM drives. An updated driver downloaded from TP Link addressed this.
All the software that ran under Windows 10 got along with Windows 11. Your mileage may vary.
The Windows 11 start menu is still more objectionable than the one in Windows 10. We immediately banished it by installing OpenShell, which turns it into a simple, highly-configurable Windows 7-style Start menu. Click on the foregoing link – it will save your walls from a lot of dents in the shape of your head.
The structure of the right-click context menus in Windows 11’s File Explorer and on its desktop has changed. By default, they’ll show you abbreviated menus, with the option to display more items and essentially behave like Windows 10’s right-click menus. You’ll need to select this option every time you use one, however, which gets old fairly quickly. You can disabuse them of this behavior and see classic right-click context menus by default like this:
- Copy this text to the Windows clipboard:
reg add HKCU\Software\Classes\CLSID\{86ca1aa0-34aa-4e8b-a509-50c905bae2a2}\InprocServer32 /ve /d "" /f. - Get to a command prompt.
- Paste the copied text into the command prompt and hit Enter.
The next time you restart Windows, all the afflicted right-click menus will have returned to their behavior as its was in Windows 10.
Windows 11’s File Explorer defaults to being substantially slower to wake up than it was under Windows 10. This one’s dead easy to address:
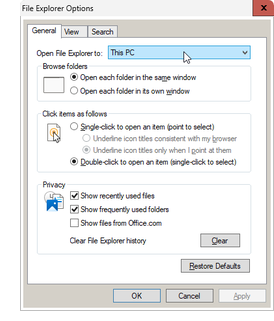
- Open the Windows Control Panel and select File Explorer Options. You can also get to this window by opening Settings and typing File Explorer Options in the Find a Setting field. A File Explorer Options window like the one to your right will open.
- Select the General tab.
- Set the Open File Explorer To field to This PC, rather than Home.
- Click on OK.
The Windows 11 task bar doesn’t allow for small icons, and as far as we’ve been able to determine, there’s no way to persuade it otherwise. You can improve its behavior to some extent, however.
Open Settings from the Windows Start menu and select Personalization. Scroll down until you find the Task Bar item and click on it.
We preferred the following settings:
- Hide Search.
- Disable Task View.
- Disable Widgets.
In Task Bar Behaviors:
- Set the Task Bar Alignment to Left.
- Enable Automatically Hide the Taskbar.
- Combine Taskbar Buttons and Hide Labels Always.
Our experience thus far has been that our upgraded Windows 11 installations get security and bug fix upgrades just like they did under Windows 10. Windows 11 installed on unsupported hardware won’t automatically download and install major revisions – for example, if you installed Windows 11 23H2, it would not have installed 24H2 for you when it became available.
You can resolve this issue by installing major revisions manually. Download the ISO installer for a later major revision – Windows 11 24H2, in the foregoing example – and double-click on it. It will open in a virtual machine environment, as was discussed earlier in this posting. Run setup.exe therein, and follow the prompts just as you did in when you installed it the first time. Be sure to select the option to preserve all your settings and files.
We like to clone the drives in question prior to doing this, also as discussed earlier, to preclude the unanticipated complete and irreversible destruction of space-time should anything go wrong.
Note that if you installed Windows 11 23H2 on a really ancient computer with an unsupported processor, as discussed earlier, you won’t be able to manually upgrade to 24H2 or any still newer release of Windows 11. 23H2 is as good as it gets in this environment.
The USB flash drive, Windows laptop and steam-punk radio graphics in this posting were generated by ChatGPT with OpenAI’s GPT-4 model, as provided by Windows CoPilot.