Windows Adjustments: Back Up your Windows Installation

The hard drive in your computer is easily its most valuable component – although its worth probably can’t be measured entirely by the damage it did to your credit card. Installing Windows, and subsequently installing all the applications that will run under Windows, can take days.
While you can back up important files on your hard drive, there’s no way to back up an entire Windows hard drive in a form that would allow you to subsequently restore it and get back on line immediately, should your current hard drive get nuked by a virus, or wiped accidentally, or just die.
At least, there’s no way to completely back up a Windows hard drive under Windows. Windows locks down several important components of itself, making them inaccessible to other applications while Windows is running. This would include whatever software was intended to back up your system.
There’s a way to get around this seemingly insurmountable problem, and I should begin by pointing out that it sounds a great deal hairier than it really is. You can back up a Windows hard drive by booting up your computer using an operating system other than Windows, from a device other than your hard drive, and running back up software from this “other” operating system.
In practice, the general lack of hairiness involved in doing so can be ascribed to something called a “rescue CD,” a dedicated version of the aforementioned other operating system and the software running under it that’s been configured exclusively to back up hard drives. A rescue CD doesn’t require that you do anything more involved that follow some prompts and find something to do while it actually backs up and restores things.
Because Windows really, really dislikes being meddled with and moved around, the ideal procedure for backing it up is what’s called a “hard drive clone.” Rather than trying to copy all of Windows’ sneaky little files and put them back where they started without Windows noticing the switch, a hard drive clone copies the low-level data stored on your source hard drive while remaining ignorant of what it contains. As long is it performs the copy procedure faithfully, the eventual restored hard drive it creates will be exactly like the one it backed up, and Windows will run just as it did before the backup.
Available Software: Send in the Clones
There are a number of commercial packages that purport to clone hard drives, and we’ve tried several of them over the years. All these experiences were fraught with trauma and anguish, and few of them ended well. As nearly as we could tell, all of them modified the hard drives they were backing up, such that if something went wrong, the drive being backed up was left in a non-bootable state.
This can get ugly pretty quickly.
There are also a number of open-source rescue CDs. Most of the ones we’ve tried have worked far better than their commercial counterparts. Perhaps more to the point, they don’t actually change anything on the hard drive to be backed up, so if something crashes or misbehaves, you can just eject the CD and restart your computer normally.
Open-source rescue CDs are typically based on the Linux operating system. This having been said, unless you insist on doing something unusual or daring with one, you’ll never have to interact with Linux directly, or know any of Linux’s weird commands or mutant language.
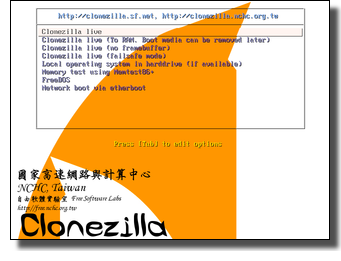
Our current favorite rescue CD is called Clonezilla. It was designed by Steven Shaiu and developed by the NCHC Free Software Labs in Taiwan. It’s available as an ISO file, that is, a CD-ROM image. Download it from the Clonezilla web page and burn the ISO file to a CD-R – all the necessary files to create a bootable rescue CD will be burnt to your CD, and you won’t have to know any more about Linux than most salad vegetables do.
There are several flavors of Clonezilla as of this writing – you’ll want the one called Clonezilla Live at the “stable” link. It was called clonezilla-live-1.2.2-24.iso as of this writing. You’ll also need CD-ROM burning software that supports ISO files. We use Roxio’s CD Creator. ISO Burner from Imtoo is a nice shareware package to perform this function.
There’s no cost to download or use Clonezilla, although the Clonezilla web page invites you to donate some cash to its authors – something you should do if you use it, as it will almost certainly save your backside sooner or later.
At this point, it’s probably worth mentioning the first of several important disclaimers. Clonezilla consists of a number of disparate open-source programs assembled with a script to run them. As with most open source software, they work really well… but they don’t look particularly polished or trustworthy. Most of the Clonezilla experience runs in text mode, with bags of inscrutable messages scrolling past you at the speed of light. Don’t let this put you off.
Actually, it’s probably worth mentioning another important disclaimer. We’ve used Clonezilla without any ill effects – which is a lot more than we can say of its commercial cousins. None the less, keep in mind that Clonezilla is going to interact with your primary hard drive in a way that offers virtually no protection against your drive being overwritten, corrupted or wiped clean if something untoward happens. As such:
- Back up all your important data and document files to conventional media before you proceed to fire up Clonezilla.
- Make absolutely certain you read the prompts and understand what you’re doing before you turn Clonezilla loose.
- Attach a note to your forehead to the effect that we are unable to assist readers of this posting with using Clonezilla, or with fixing any problems it might create. If something goes wrong, you are absolutely on your own. In the event that you’re unable to live with this condition, click on BACK now. By reading any further, you absolve Alchemy Mindworks, its shareholders, employees, stockholders and suppliers and the author of this posting from any costs arising out of loss, damage or expense caused by your use of the information in this posting, however it occurs, and you undertake to defend same from any and all legal action arising thereof, including but not exclusive to attorney’s fees, damages, judgments and court costs. The lawyers made us say that – the bad sentence structure probably gave it away.
Clonezilla Eats Manhattan

When Clonezilla boots up, it will create a small version of Linux in your computer’s memory, which will remain in place for the duration of your Clonezilla session. It will then run the appropriate parts of itself to back up your hard drive. You’ll need to select some defaults and confirm a few actions.
In addition to the Clonezilla CD-ROM, you’ll also need somewhere to back up your hard drive to. In theory, you could send the image data over a network to a server or other storage device, or write it to a great many DVD-Rs. Neither of these options is particularly easy to deal with, however. In this example, we’re going to use a removable USB hard drive as the destination storage device to hold your hard drive image. Make sure you have one that’s at least as large as the hard drive you want to back up, and is initially empty.
There are a few terms and concepts you’ll probably bump into in using Clonezilla – you won’t need to get deeply into these matters, but having the important ones by the throat may help alleviate some of the unspeakable terror of turning unknown and none-too-pretty software loose on your unprotected computer.
- Data block: The low-level structure of your hard drive is a sequence of chunks of data, called “blocks.” Your operating system uses them to store more complex data structures, most notably, files.
- Disk image: Clonezilla is going to grab all the blocks on your hard drive and store them in a big file on your removable USB drive. This is called a disk image. In fact, it’s going to store them in a sequence of big files on your USB drive, because your USB drive can’t handle a single file larger than two gigabytes.
- Partition: A hard drive can be divided into multiple logical drives, each one called a partition. As such, you could set up a big hard drive with multiple partitions, such that it looks to Windows as drive C:, drive D: and drive E, for example. You could also set one up so that it had a Windows partition and Linux partition, and prompted you to choose which operating system you wanted to use each time it booted up. This is complicated – don’t go there. A simple Windows system typically has several partitions on its hard drive – there’s the one that you usually deal with, and a largely invisible “rescue” partition, which Windows can use to repair itself in some situations. It’s not important that you know what the partitions of your hard drive are up to, but you’ll probably want to keep in mind that there are more of them than you think, if you watch Clonezilla at work.
- Device: Linux calls hard drives “devices,” or even more inscrutably, “mount points.” In most case, your internal hard drive will be called sda1 or hda1, and your removable USB drive will be called sdb1. These device names might change, depending on the actual storage technology being used. The Linux notation for a device is typically /dev/sda1, for example. To keep the purists happy, sda is your hard drive, and sda1 is the first partition thereon.
- NTFS: This stands for New Technology File System, and is the file system that underlies Windows XP, Vista and Windows 7 in most installations. You’ll find references to it in the device lists that appear in Clonezilla. It’s a good indication that the device in question is your internal hard drive.
- FAT: This stands of File Allocation Table, and is the file system that’s usually used on removable USB hard drives – some use NTFS.
As an aside, once you get started with Clonezilla, it can be a bit tricky to determine which Linux device is your internal hard drive and which is your USB drive. This situation will be exacerbated if you have lots of other removable storage devices connected to your system. It’s a really good idea to power down or disconnect any other external hard drives or flash drives you won’t be using for this procedure.
As a final note before this discussion gets disturbing, you can run Clonezilla successfully with a minimum level of technical competence. If you’re unusually dangerous around things with plugs, however, and you have a more technical friend handy, this might be the time to invite him or her over to your digs for a meal and an evening of hard drive management.
Backing up your Hard Drive

The following procedure will create a disk image of your internal hard drive on your removable USB drive, which will subsequently be available to restore. Here’s the rub.
- Restart your system with the Clonezilla CD in your CD-ROM drive. You might have to reconfigure your computer to boot up from its CD. Clonezilla, rather than Windows, should boot up.
- Hit Enter to select the default Clonezilla screen settings. Linux will begin to boot up. A great deal of text will scroll past your screen – ignore it all, or your head will explode.
- Hit Enter to select English when the language prompt appears, or choose another language.
- Hit Enter to use the existing key map – this defines how your keyboard will be managed by Linux.
- Hit Enter to start Clonezilla.
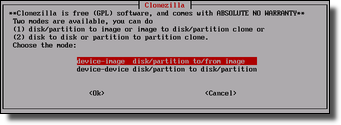 Hit Enter to work with disk or partition images. You do not want to copy directly from one disk to another, which would require that you have two internal hard drives installed in your computer.
- Hit Enter to select Use Local Device. This will allow you to copy your hard drive image to a local USB removable hard drive. The other options involve sending your hard drive image over a network to a server, which unquestionably involves more hoops than you need to jump through just now.
- Some slightly inscrutable text will appear at the bottom of your screen. Plug in your USB hard drive if you haven’t done so previously. Wait for at least five seconds so it can spin up and then hit Enter.
- When the Mode screen appears, locate your USB hard drive. It will typically be the last item in the list, usually on a line that begins sdb1. The other items, usually beginning sda1, will be partitions of your internal hard drive. Use the arrow keys to select the external USB hard drive entry and hit Enter.
- Hit Enter to select the top directory, that is the root, of your removable hard drive as the location to write a disk image to. Clonezilla will create a subdirectory therein. Some text will appear at the bottom of your screen. Hit Enter to continue.
- Hit Enter to select Beginner Mode – it sounds a bit condescending, but it uses a well-chosen set of defaults.
- Hit Enter to save your local hard drive as an image.
- Hit Enter to accept the default image folder file name.
- Select the internal hard drive to copy to an image. Chances are, you’ll only have one. Hit Enter.
- Some text will appear at the bottom of your screen Hit Enter to continue.
- After quite a bit of text scrolls past, you’ll be asked if you’re sure you want to continue. Hit y and then hit Enter.
- Find something to do for about two hours. Note that in addition to writing the primary partition of your hard drive to an image, it will probably store one or more smaller partitions – it’s not over ‘til the software says it’s over.
When Clonezilla has finished creating a disk image, it will offer you a number of shut- down options. Reboot your computer. Linux will wind itself down and eject the Clonezilla CD-ROM before it restarts Windows. You’ll probably want to boot your computer normally and make sure that your original Windows installation is still behaving itself.
Restoring your Hard Drive

You can just stash your removable USB drive with its completed disk image somewhere safe, along with a copy of the Clonezilla CD, against the day you try to boot up Windows and you notice that world has come to an end.
We’re extremely fond of removable hard drives, and as such, we created clones of several critical Windows drives as soon as Clonezilla was finished backing them up. This both confirmed that the backup procedure was successful, and provided us with plug-in replacements for these drives with essentially no wait time, in the event of a catastrophe.
Here’s how to restore your hard drive from an image created by Clonezilla. This is also how you can create a clone of your hard drive – just restore the image to another hard drive. In the latter case, you should use the same size hard drive as the one you created an image from, and ideally, the same model of drive. While it’s possible to restore a disk image to a larger drive and subsequently fiddle the partition tables thereof to avail Windows of the extra real estate, doing so is well beyond the scope of this posting.
To restore a backed-up image to your hard drive:
- Repeat the foregoing procedure, up to but not including step 12.
- When you reach the Clonezilla: Select Mode screen, use your arrow keys to select Restore an Image to Local Disk and hit Enter.
- Clonezilla will prompt you to choose an image file to restore – there should be only one. Hit Enter.
- Select the hard drive to restore your image to – again, there’ll probably only be one option. Needless to say, once Clonezilla gets going with this part of its adventure, everything currently on the destination hard drive will be toast. Hit Enter.
- Some text will appear at the bottom of your screen. Hit Enter.
- You’ll be asked if you’re sure you want to continue. Enter y and hit Enter.
- You’ll be asked again if you’re sure you want to continue. Enter y and hit Enter.
- After a considerable amount of scrolling text, you’ll see a Partclone window with a bar graph indicating how things are going. Plan on about a wait of about a third of the time required to back up your hard drive.
Once again, let Clonezilla shut down and reboot and it’s done. Your restored hard drive should now be bootable, and behave just like the original drive you backed up.
Backing up your hard drive this way is time consuming, and will tie up some modestly expensive hardware. For most Windows users, it will entail repeating the backup procedure periodically, to keep your backed up disk image up to date. It will, however, provide you with a largely bulletproof way to get your computer back on line quickly and reliably in the event of something nasty happening to your Windows installation. You’ll be able to look smug while all around you are shrieking in terror and searching for a tall building to leap from. It will have been worth the effort.
Please see the disclaimers for Windows Adjustments before you apply the information at this post.
Robert John Bennett:
A superbly clear and detailed explanation of how to use Clonezilla. Many thanks. And when you write, “We’ve used Clonezilla without any ill effects – which is a lot more than we can say of its commercial cousins,” you are describing something that for me is the absolute truth. Some commercial backup software can be a real disaster.
December 3, 2009, 5:00 pmMel Ellington:
Ditto what Robert Bennett said. Superbly clear and truthful. I’ve lost a lot of data and time backing up/cloning with … I’ll try Clonezilla in the near future. However, I don’t believe it has incremental backup and that is something I would really need. Consequently, I may have to rely on some others …
January 30, 2010, 8:28 pm[Redacted]:
The first Clonezilla manual I understand. Exactly what I was seen on the screen. Well done.
November 16, 2011, 7:06 pmGreetings from The Netherlands.