Taming Windows 11
 The Windows 11 operating system is rich with features and nuance, but it often feels like the slowest and most cumbersome Windows in history. If you have a lightning-fast computer — and you don’t mind forsaking a portion of its power to Windows’ internal machinations — you might not notice its languid disposition.
For those of us who live in this universe… with more modest hardware and work to get done… it’s possible to configure Windows 11 to make it substantially less resource-hungry, and as such, noticeably quicker and generally better behaved. Some of these refinements are extremely obscure, but they’re unquestionably worth investigating.
This posting is our canonical list of the Windows 11 improvements we use in house. We hasten to add that no one of these is likely to kick Windows into hyperspace, but collectively they’ll make it seem like the simpler and much faster Windows of an earlier epoch.
As with all forays into Windows’ internal workings, we recommend creating a Windows restore point before you start clicking on things.
Note: The following discussion involves making changes to the system settings and major changes to your computer’s operating system. While the likelihood of all this going sideways and negatively impacting Windows… and your ability to use it… is remote, the possibility exists. By reading beyond this paragraph you agree that Alchemy Mindworks accepts no responsibility for any loss, damage or expense caused by your use of this page and the information therein, however it occurs. If you read any further, you accept these terms and you indemnify and hold blameless Alchemy Mindworks and all its stockholders, employees and suppliers from any and all monetary costs including attorney’s fees and court costs arising out of your use of this page and any information provided by it. We are unable to provide assistance with anything discussed in this posting.
Disable SysMain
Windows runs a lot of things behind your back, and most of them are integral to its operation. A few are antiquated, ill-chosen or genuinely unnecessary. Disabling them is a great place to start improving the performance of Windows 11.
The first of these unnecessary components we’ll look at here is a Windows service called SysMain. Services are background functions that Windows starts either automatically when it boots, or on demand at such time as they’re called for.
 You can access a list of Windows’ services like this:
- Select Run from the Windows Start menu, or hold down the Windows key on your keyboard and hit R. A Run window will open.
- Type
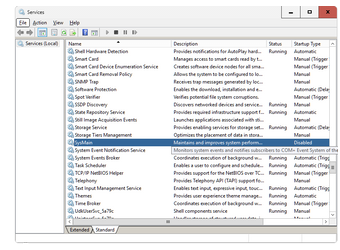
services.mscin the Open field of the Run window and click on OK. A Services Window like the one to your right will open.
The SysMain service is a legacy of simpler times. It was originally called Superfetch. It attempts to analyze your use of Windows’ features and the applications you run, and pre-load things you’re likely to need into memory. On a modern computer with lots of memory and a quick SSD, it’s essentially useless. It consumes system resources just the same.
You can disable the SysMain service and speed up Windows.
- Scroll down the list of items in the Services window until you locate SysMain.
- Right-click on SysMain and select Properties from the menu that appears. A Properties window will open.
- Set the Startup Type field to Disabled.
- Click on Stop to stop the currently running SysMain on your computer.
- Click on Apply.
- Click on OK to close the Properties window.
Disable Windows Search
Windows has a service to ostensibly optimize the Search function of File Explorer. It does so by maintaining an index of all the files on your hard drive, so it can search the index rather than the files themselves. In that the Search function in Explorer is somewhat crude, you might want to disable Windows Search.
This will also be the case if you just don’t use Search very often.
Needless to say, the Windows Search service occupies significant system resources, especially if you frequently add, remove or relocate files on your hard drive.
You can disable the Windows Search service through the Services window, just like SysMain, above.
Disabling Windows Search won’t prevent the Search function in File Explorer from working. It will make it slightly slower, on those few occasions it gets to see daylight.
Disable Connected User Experiences and Telemetry
 The Windows Connected User Experiences and Telemetry service collates diagnostic data on your machine and forwards it to Microsoft. It provides you with no tangible benefits, and it consumes system resources and Internet bandwitdth.
You can disable it in the Services window, as discussed earlier in this post.
You should also disable the collection of diagnostic data for your computer.
- Open the Settings window through the Windows Start menu, or hold down the Windows key on your keyboard and hit I.
- Select Privacy and Security.
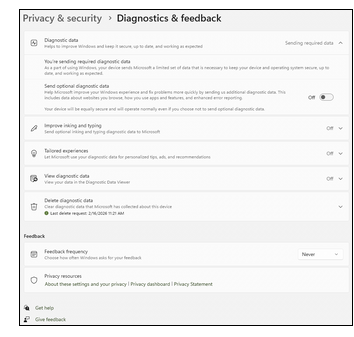
- Click on Diagnostics & Feedback.
- Turn off all the Diagnostic Data options.
- Delete any existing diagnostic data
You might want to set the Feedback Frequency option to Never, so Windows stops asking you for feedback.
Disable Update Delivery Optimization
Windows has an internal mechanism to allow one computer on a local network to download Windows updates, and then distribute them to the rest of the machines on the network. If you look around and notice that you’re living in a house rather than an office building, you probably don’t need this feature. It soaks up a substantial amount of hard drive space, even if it’s not used.
- Open Windows Settings, as discussed earlier, and select Windows Update from the list in the left portion of the window.
- Click on Advanced Options.
- Select Delivery Optimization and turn it off.
Disabling Delivery Optimization won’t interfere with Windows downloading and installing updates for your computer.
Disable Print Spooler
 If your computer isn’t connected to a printer, and you as such never actually print anything, you can free up some system resources by disabling the Print Spooler service through the aforementioned Services window.
Keep in mind that you’ve done this – if you do get a printer in the future, you’ll want to re-enable it.
If you have a printer but rarely use it, you can set the Startup Type field in the Properties windows to Manual. This will prevent the Print Spooler service from starting until you actually print something.
Disable Remote Desktop Services
If you never access your computer remotely, you can safely lose the service that supports this. Use the Services window, as discussed earlier, to locate Remote Desktop Services and set it to Disabled.
If you think you might want it on occasion, set it to Manual – it won’t run unless it’s called for.
Disable Fast Start
Several versions of Windows ago, Windows Fast Start appeared – and at the time, it was a cool idea. With Fast Start enabled, rather than boot up from an absolute standing start every time you hit the power button on your computer, Windows would open a large file of its core components and drivers, and read it into memory.
Fast Start was useful back when computers ran on relatively slow mechanical hard drives. It’s something of an anachronism on a system that includes a quick SSD. The hibernation file created on your hard drive, hiberfil.sys, typically occupies several gigabytes. The speed improvement offered by Fast Start on a modern computer is usually too small to notice.
You can disable Fast Start:
- Select Start → Programs → Windows System and locate the Command Prompt. Right-click on Command prompt and select Run As Administrator. An Administrator: Command Prompt window will open.
- Type
powercfg /h onand hit Enter. - Type
powercfg /h offand hit Enter. - Type
powercfg /aand hit Enter to see the status of hibernation and Fast Startup. The last line in the resulting screen should say something to the effect that Fast Startup isn’t available or operational.
When you have successfully disabled Fast Start, hiberfil.sys should be automatically removed from the root of your C: drive. Type dir \ /a in your Command Prompt window to see all the files in the root of your C: drive – if hiberfil.sys isn’t there, you’re good to go. Note that the Command prompt window has a scroll bar to allow you to see lines that have scrolled past.
In some cases, you might need to repeat the foregoing procedure to fully disable Fast Start and remove hiberfil.sys – this option occasionally needs to be cycled once or twice to relent and go away.
Speed Up File Explorer
The ubiquitous Windows File Explorer application defaults to decidedly sluggish behavior. You can light its afterburners with a few simple adjustments.
One of the most resource-hungry aspects of File Explorer is its insistence on surveying every folder it’s pointed at, deciding what the predominate file types therein do and configuring itself to display what it thinks is the most relevant information about them. It has pre-defined modes for folders with mostly music files, mostly pictures, mostly videos and so on. It takes a significant bucket of processor resources to manage all this.
If you tell Explorer to treat all the folders it encounters as having files it doesn’t know the nature of, it will stop doing this.
 You’ll need to edit your system registry for this enhancement. Open the Windows Run window, as discussed about, type
 regedit in the Run field and click on OK. The registry editor will open.
You’ll need to get to this item in the registry: HKEY_CURRENT_USER\Software\Classes\Local Settings\Software\Microsoft\Windows\Shell\Bags\AllFolders\Shell — you can either navigate to it through the Registry Editor’s interface, or copy the foregoing text and paste it into the field above its item list, and then hit Enter. Note that the foregoing is a single line of text.
You’ll need to add an item to the Shell folder of the registry, like this:
- Select the final Shell folder.
- Right-click in the large white area and select New from the menu that appears.
- Create a new String Value .
- Right-click on your new String Value item and name it
FolderType. The F and the T must be in upper case, and there should be no spaces in the name. - Double-click on FolderType to open its Edit String window.
- Set the Value Data field to
NotSpecified. - Exit the Registry Editor.
You can arrive at the same result without involving the Registry Editor, like this:
- Open Windows PowerShell as Administrator – select Start → Programs → Windows Powershell, and then right-click on the Windows PowerShell item. Select Run as Administrator from the menu that appears. A PowerShell window will open.
- Copy this text to the Windows clipboard:
Set-ItemProperty -Path 'HKCU:\Software\Classes\Local Settings\Software\Microsoft\Windows\Shell\Bags\AllFolders\Shell' -Name 'FolderType' -Value 'NotSpecified' -Type String. Note that the foregoing is a single line of text. - Paste this text into your PowerShell window and then hit Enter.
The next time you start Windows, Explorer will be substantially quicker.
File Explorer is initially configured to open itself with a view to your Home screen, which takes a significant amount of time to access. This one’s dead easy to change.
- Run File Explorer.
- Click on the three dots in its tool bar and select Options from the menu that appears. A Folder Options window will open.
- In the General tab, set the Open File Explorer field to This PC.
- Click on OK
While you’re in the General tab, you might want to locate the Privacy section. Disable the Show Recently Used Files and Show Recently Used Folders items. These pertain to Windows automatically adding recent files and folders to Explorer’s Quick Access list, which expands it unnecessarily, and increases the time Explorer needs to start.
The structure of the right-click context menus in File Explorer, and on the Windows desktop, became somewhat unwieldy in Windows 11. They’ll show you abbreviated menus, with the option to display more items. You’ll need to select this option every time you use one, however, which gets old fairly quickly.
You can disabuse the right-click menus of this behavior and see complete right-click context menus by default.
- Copy this text to the Windows clipboard:
reg add HKCU\Software\Classes\CLSID\{86ca1aa0-34aa-4e8b-a509-50c905bae2a2}\InprocServer32 /ve /d "" /f. Note that the foregoing is a single line of text. - Get to a Windows command prompt.
- Paste the copied text into the command prompt and hit Enter.
The next time you restart Windows, all the afflicted right-click menus will have returned to their behavior as its was in Windows 10.
Disable File Warnings
 In keeping with its emphasis on security, rather than getting any useful work done, Windows 11 defaults to warning you about opening any file you haven’t opened before through File Explorer, or by double-clicking on a desktop shortcut icon. This includes actual executable software.
This too can get old very, very quickly. It also soaks up non-trivial levels of system resources.
If you habitually download a lot of questionable software and documents from web pages with innumerable spelling errors and links entitled “click here to install malware,” you should arguably skip the rest of this section. Alternately, if you have two or more demonstrably functional brain cells, you might want to disabuse Windows of its overly paranoid nature in this regard.
The easiest way to tell Windows to stop warning you about everything you click on is through the Windows Group Policy Editor. Note that the Group Policy Editor is not included in Windows Home – we’ll get to working around this issue in a moment.
To calm Windows down with the Group Policy Editor:
- Open the Windows Run window, as discussed earlier.
- Enter
gpedit.mscand click on OK. A Group Policy Editor window will open. - Navigate to User Configuration → Administrative Templates → Windows Components → Attachment Manager.
- Double-click on Inclusion List for Low File Types. An editor window will open for it.
- Click on the Enabled option.
- Click on the Options field and enter the file extensions you’d like Windows to trust if you double-click on one. We use
.lnk;.exe;.bat;.cmd;.zip;.bat;.ps1;.png;.jpg;.gif;.webp;.mp3;.mp4. This covers Windows executables, and several common document types. You might want to adjust this list for your needs. Make sure there’s a dot before each file extension, and a semicolon after all but the last one. - Click on OK
A more global resolution for this issue is to disable the entire mechanism by which Windows keeps track of where documents and executables arrive from, and whether they’ve been opened previously. In the same Group Policy Editor window, above:
- Double-click on Do Not Preserve Zone Information in File Attachments in the foregoing Group Policy Editor pane. An editor window will open.
- Click on the Enabled option.
Click on OK.
You can now exit the Group Policy editor.
If you have Windows 11 Home, and hence lack the Group Policy Editor, you can use the Registry Editor to arrive at the foregoing results.
To set a list of file extensions for Windows to avoid getting flustered about:
- Use the registry Editor, as discussed earlier, to access this folder:
HKEY_CURRENT_USER\Software\Microsoft\Windows\CurrentVersion\Policies\Associations. Note that the foregoing is a single line of text. - Create a new String Value and set its contents to the list of extensions you’d like to trust – just copy and paste the list from earlier in this section to get started.
To completely disable Windows’ zone information tracking logic – admittedly, our preferred resolution for this issue:
- Use the registry Editor to access this folder:
HKEY_CURRENT_USER\Software\Microsoft\Windows\CurrentVersion\Policies\Attachments. Note that the foregoing is a single line of text.
- Create a new DWORD item, double-click on it and set its Value field to 1. Note that 1 is the same whether you set the Base selection to Decimal or Hexadecimal.
Disable Notifications
Windows likes to pop up notification windows for just about everything it does. If you haven’t grown to loath these yet, give it a few hours.
You can disable most or all notifications, as you prefer.
- Run the Windows Settings window and select System from the list near its left side.
- Click on Notifications.
- Turn off anything you don’t want to be notified about. We typically disable the lot.
You might also want to scroll down to Additional Settings and click on it. Uncheck the boxes therein to prevent Windows from opening windows with tips and suggestions.
Disable Startup Applications
As it’s initially installed, Windows will start a number of applications when it first boots up. This both extends the time required for it to crawl out of bed and get to work, and soaks up significant system resources to maintain these programs.
You might want to review what it’s starting, and disable some or all of them.
Open the Windows Settings window, select Apps from the list near its left side and click on Startup. Review the list of applications therein, and turn off anything you don’t need to have booted up when your computer first comes on line.
You might find a few low-level drivers or processes in this list that really should run when your computer starts. You also might find things you really want to come on line immediately – most of our computers boot The Ultimate Screen Clock to set the system time by referencing an on-line atomic clock, for example. Applications such as Microsoft Phone Link can be disabled for most users.
Keep in mind that disabling an application in the Start list usually won’t mean that it’s inaccessible – it will just require a few extra seconds to start when you need it the first time.
In answer to what will be a question for some users, turning off Windows CoPilot in this list won’t disable CoPilot – once again, it will just entail a wait for a few extra seconds the first time you run CoPilot in a Windows session. We asked it about this, and it agreed with our understanding of this option.
Reclaim Your Lock Screen
 Left to its own devices, Windows 11 is disposed to adding things to its lock screen, the initial screen that appears when it has completed its boot-up. Usually they’re advertisements. Aside from their annoying demeanor, they can add a few seconds to the time required for Windows to boot up.
You can prevent its interfering with your lock screen:
- Open the Windows Settings window and select Personalization.
- Click on Lock Screen.
- Disable Get Fun Facts, Tips and More on your Lock Screen.
- Set Lock Screen Status to None.
- Set Personalize Your Lock Screen to Picture, and choose a suitable graphic.
Replace the Start Menu
Windows 11’s Start menu arguably suffers from a degree of disorganization and bloat. You can diminish this to some extent through the Settings → Personalization → Start window. You can also just replace the Start menu entirely with something that’s easier to get along with.
A number of replacement Start menu applications exist for Windows 11. Our favorite is Open Shell. You can access its GitHub page and download its installer. As of this writing, it’s free.
Open Shell will replace Windows’ internal Start menu with a highly-configurable Windows 7-style menu.
Tune Windows’ Text
You can improve the appearance and performance of the Windows text rendering engine – and as such, everything that happens when Windows displays text – with almost no effort. The Registry Editor will not be called for.
- Open the Windows Run window, as discussed earlier.
- Type
cttunein the Open field and click on OK.
Windows’ Clear Type Text Tuner will run. Step through each of its screens to set the default behavior of its text.
- Turn on Clear Type for more readable text.
- Set your monitor to its native resolution, if this isn’t the case.
- Locate the best-looking text in the five example screens.
This one takes almost no time, and has immediately visible results.
Disable Visual Effects
 Windows includes a number of really cool on-screen visual effects that look seriously state of the art and leading edge… and soak up a remarkable amount of system resources, pretty much all the time. Disabling them will speed up your computer without losing any useful functionality. Here’s how to access them:
- Open the Windows Settings window and click on Accessibility in the list near its left side.
- Click on Visual Effects.
- Turn off Transparency Effects.
- Turn off Animation Effects.
You can optionally turn off Always Show Scroll Bars while you’re at this screen – having this option on will hide the scroll bars in things like your web browser when they’re not actually being used, and leave slightly more available window space.
To further refine Windows on-screen behavior, enter Adjust the appearance and performance of Windows into the Find a Settings field at the top of the Settings window and hit Enter. A Performance Options window will open.
Select the Adjust for Best Performance option to configure Windows to disable all its superfluous effects. Alternately, select Custom and turn off anything you don’t need. For us, this involved disabling every option in the list except for Smooth Edges of Screen Fonts.
The results of these improvements are seriously impressive.
Remove Unwanted Windows Apps
While having unnecessary software on your hard drive won’t impact Windows’ performance per se, it will waste space. Open the Windows Settings window, as discussed earlier, and select the Apps option. Click on Installed Apps to see a list of all the applications installed on your computer.
You can uninstall anything you’re certain you’ll never need. The Xbox software is the first thing we usually remove, followed by Microsoft Weather. Your mileage may vary.
Most of the Microsoft applications you might be disposed to removing can subsequently be reinstalled through the Microsoft Store if you change your mind.
Note that the Installed Apps list usually includes some drivers and other low-level system components. In looking for candidates worthy of deletion, make sure you know what your potential victims do before you dispatch them to cybernetic oblivion.
Disable Secure Boot on Older Hardware
 Windows 11 prefers to have the hardware Secure Boot option enabled. This is usually managed through a setting in your system BIOS. Secure Boot is a somewhat niche security issue, but it offers genuine benefits in protecting your computer against specific types of malware.
Secure Boot uses a certificate to validate the Windows boot process, and the original set of certificates is due to expire in mid-2026. If your computer is reasonably new, Windows will automatically install updated certificates. It won’t do so for more venerable hardware.
If your computer is old enough to have required a forced upgrade to Windows 11, it’s likely that it’s too old to receive a new Secure Boot certificate.
You can determine whether your computer has had its Secure Boot certificate updated like this:
- Open a PowerShell window as Administrator, as discussed earlier in this posting.
- Copy this text to the Windows clipboard:
([System.Text.Encoding]::ASCII.GetString((Get-SecureBootUEFI db).bytes) -match 'Windows UEFI CA 2023'). Note that the foregoing is a single line of text. - Paste the copied text into your PowerShell command line and hit Enter.
After a brief wait, Windows will tell you the result of your query. If it says True, your Secure Boot certificate has been updated, and you can stop reading now. If it says False, it hasn’t been updated. Should you be reading this near or after the middle of 2026 and encounter the False result, it’s likely that it never will be updated.
Secure Boot protects your computer against rootkits and bootkits that insert themselves in the chain of software that initially boots up your computer. These types of malware hide under Windows, and as such are resistant to being detected by conventional Windows-based security software.
If your computer only runs software from reliable sources, the likelihood that it will be exposed to the type of malware Secure Boot protects it from is quite low. Specifically, you should:
- Only download, install and run software from trusted sources.
- Be really careful about installing drivers unless you know where they’ve originated. Avoid driver download sites.
- Scan everything you download with Windows Defender.
- Avoid weird, dark and obviously untrustworthy web sites.
- Never plug in USB devices from third parties.
- Never run experimental operating systems.
- Never allow untrusted users to access your computer.
Depending on the configuration of your PC’s hardware, it might refuse to boot when its Secure Boot certificate expires, or it might display scary warnings.
If you’re comfortable with your level of security, you can disable your computer’s Secure Boot option before its certificate expires, or once it begins to misbehave as a result of its doing so.
- Reboot your computer.
- Repeatedly hit F2 when it begins to boot, until the BIOS configuration screen appears. Check the documentation for your computer if this screen proves to be accessed by a different procedure.
- Locate the Secure Boot option and disable it.
- Exit the BIOS configuration screen. Your computer should proceed to boot up normally.
If your computer does get involved in any of the aforementioned risky adventures and it’s too old to receive updated Secure Boot certificates, you might need to think seriously about a new PC.
Most of the graphics in this post were created by ChatGPT with OpenAI’s GPT-4 model, as provided by Windows CoPilot.